
A game server can start successfully and still fail when friends join, a world grows or the next update arrives. Hosting it on a VPS gives you control over the process, network rules and save files, but it also makes those details your responsibility.
This guide covers Linux dedicated servers for Palworld, Valheim and ARK: Survival Evolved. Start with one game and a private test group. Verify its edition, server build and resource requirements before choosing a plan, then prove that players can join and that a saved world survives a restart.
Match the Game Edition to Your VPS
Game-client requirements are not dedicated-server requirements. A client includes rendering; a dedicated server coordinates the persistent world, player sessions and networking. Likewise, a configurable player limit is not evidence that a particular VPS can support that many active players.
| Game | Linux deployment route | What to verify before ordering |
|---|---|---|
| Palworld | Official dedicated-server package through SteamCMD; app 2394010 | Pocketpair lists 16 GB memory and recommends more than 32 GB, with 4 or more CPU cores recommended. Confirm the VPS allocation and CPU model; virtual cores are not a measured performance guarantee. |
| Valheim | Publisher-documented Steam Library → Tools → Valheim Dedicated Server | The publisher guide specifies libraries and networking, but does not supply a comparable CPU/RAM/disk sizing table. Measure your world and intended players instead of treating a generic 4 GB claim as an official minimum. |
| ARK: Survival Evolved | Evolved dedicated-server package; app 376030 | Confirm the current Linux build, map, mods and client/server branch. Survival Ascended is a different product and must not be installed using an Evolved command. |
Sources checked 20 October 2026: Pocketpair server requirements, Iron Gate’s dedicated-server guide and the publisher’s ARK release guidance. Palworld’s memory figures are publisher guidance, not measurements from this article. Its statement that 8 GB can boot also warns of out-of-memory crashes; it is not a sensible substitute for the listed requirement.
For storage, leave room for the installed game, updates, mods, growing worlds and recovery copies. Check actual package size after installation and retain free space for updates; an invented universal disk allowance would hide those differences. Choose a region by testing connections from the players’ networks. Distance alone cannot predict latency because routing and congestion also matter.
If your chosen plan does not meet the game’s documented memory requirement, select a suitable configuration or another hosting arrangement before proceeding. A low starting price does not make an undersized plan suitable for Palworld.
Protect SSH and Game Traffic
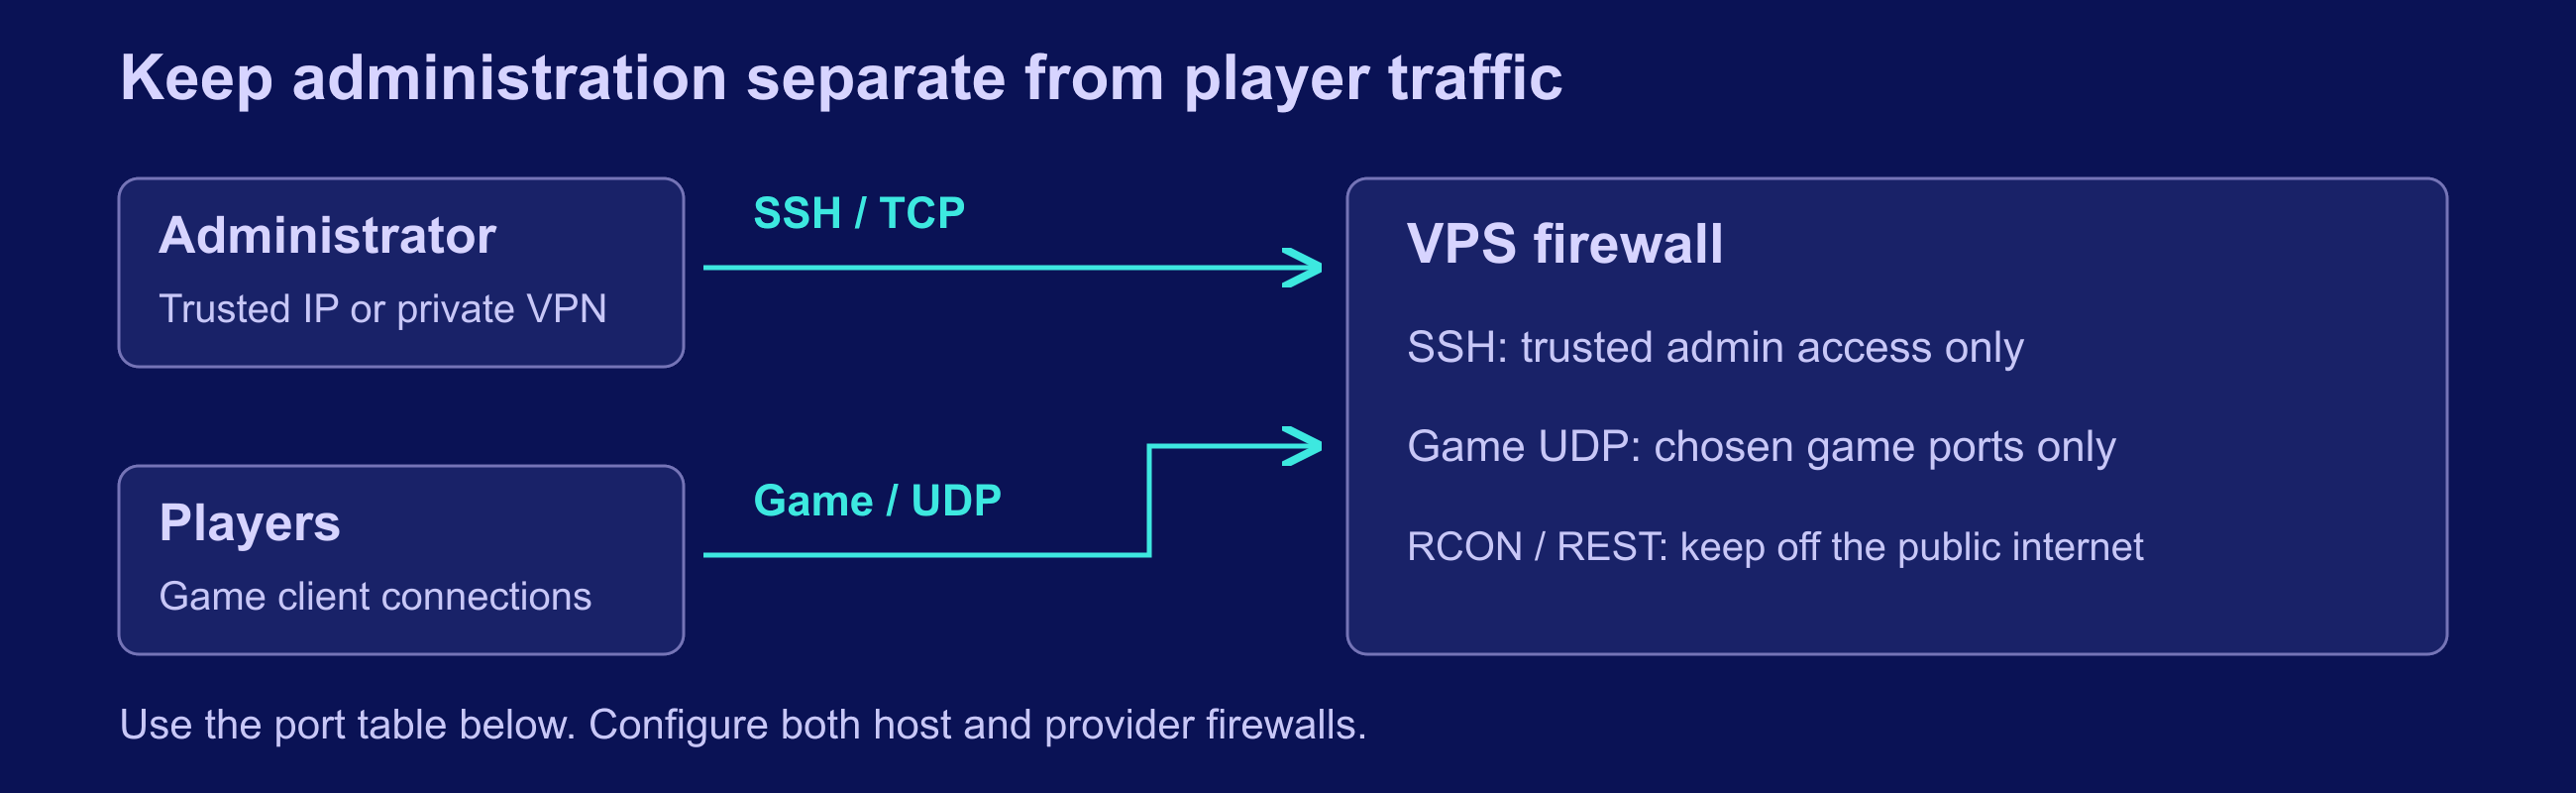
Administration and player access have different trust boundaries. Limit SSH to your administrators, expose only the selected game’s required traffic, and keep remote control interfaces such as RCON or REST APIs private. Apply the same policy to the VPS provider’s firewall and the operating-system firewall.
Use SSH keys with an existing sudo-capable administrator. On your own computer, create a key if you do not already have one, copy its public key, and verify a second login while keeping the first session open:
ssh-keygen -t ed25519
ssh-copy-id admin@YOUR_SERVER_IP
ssh admin@YOUR_SERVER_IP
Replace the account and address with your actual values. Before disabling password authentication, confirm that the key-based login can use sudo and that the provider’s recovery console works. Ubuntu’s OpenSSH documentation explains configuration snippets and validation. Check the effective configuration with sudo sshd -T, validate changes with sudo sshd -t, then reload using your distribution’s documented service procedure. Do not add a root-only AllowUsers rule or change SSH ports as an unexplained prerequisite.
| Service | Ports for the configuration described here | Exposure |
|---|---|---|
| SSH | Your configured TCP port; normally 22 | Trusted administrator IP addresses or private VPN |
| Palworld | 8211/UDP by default | Players; change the firewall if you change the listening port |
| Valheim, Steam backend | 2456–2457 by default; verify the protocol in the installed package instructions | Players; chosen port and chosen port + 1 |
| ARK: Survival Evolved | Configured gameplay and query endpoints; verify the current server settings and listening sockets | Game traffic and Steam query traffic; verify configured ports |
| Optional remote administration | Only the endpoint you deliberately enable | Keep private; do not expose it merely because a tutorial lists a port |
Port sources: Palworld and Valheim, checked 20 October 2026. The Valheim guide documents the port range but does not specify its transport protocol in the cited text. The ARK row is a verification checklist, not a sourced default-port recipe; confirm its gameplay and query endpoints before opening access. Valheim’s crossplay backend uses a relay and does not require router port forwarding; follow its distinct connection instructions instead of assuming every deployment uses the Steam backend.
For a fresh Ubuntu host, the following is a Palworld-only firewall example. First substitute a trusted public administrator IP or CIDR, the actual SSH port and a private tester’s public IP. Keep the game restricted to that test group until passwords are configured. Confirm matching provider firewall rules before enabling UFW:
sudo ufw default deny incoming
sudo ufw default allow outgoing
sudo ufw allow from YOUR_ADMIN_IP to any port 22 proto tcp
sudo ufw allow from YOUR_TESTER_IP to any port 8211 proto udp
sudo ufw enable
sudo ufw status numbered
Install UFW first if it is absent, using Ubuntu’s firewall instructions. Open the selected game’s ports, not every row in the table. Check IPv6 exposure as well as IPv4. If you later switch to containers, review Docker’s firewall behavior: published container ports need their own review and should not be assumed protected by an existing UFW rule.
Prepare Linux and SteamCMD
Use a supported 64-bit Linux system and the game publisher’s current dependency list. Install SteamCMD through Valve’s Linux instructions for that distribution; repository configuration and 32-bit compatibility libraries differ. Confirm the steamcmd executable is available before using the installation commands below.
Run game software as an unprivileged account rather than root. The following example creates a dedicated home for one trusted game-server workload. Use separate accounts and directories if you later run multiple games or mods with different trust requirements:
sudo useradd --create-home --home-dir /srv/games --shell /bin/bash gamehost
sudo -iu gamehost
command -v steamcmd
mkdir -p ~/servers ~/worlds
Run the game and the remaining shell examples as gamehost. Palworld and ARK below use SteamCMD; Valheim follows the publisher’s separately documented installation route. This account has no usable password for password-based login; administer it with sudo from your normal administrator account. If the account already exists, inspect its home and permissions rather than recreating it.
Keep application binaries, configuration and world data identifiable. Document the actual save directory for each game. Do not repartition a disk or format a device just to install Palworld: its official Linux route installs an application into the existing filesystem. Containers are another deployment choice, not a requirement for this guide; our Docker VPS guide covers that operating model.
Install the Game You Chose

Install one server first, then verify its initial startup in the foreground. The screenshots identify the official English product or documentation pages; they are not evidence that these commands were benchmarked on a particular VPS. Keep your client, dedicated-server build, branch and mods compatible.
Palworld: Use the Official Dedicated Server

Pocketpair documents anonymous SteamCMD installation of app 2394010. This example explicitly chooses a directory so you can find it later:
steamcmd +force_install_dir /srv/games/servers/palworld +login anonymous +app_update 2394010 validate +quit
cd /srv/games/servers/palworld
./PalServer.sh -port=8211
Follow the official deployment instructions for any missing runtime dependency. After the first startup creates the configuration directory, stop the server cleanly and configure Pal/Saved/Config/LinuxServer/PalWorldSettings.ini using the publisher’s configuration reference. The template DefaultPalWorldSettings.ini is not the live settings file. Set a private server password and separate administrator credentials before inviting players.
For direct connections, share your public address and the configured game port. Do not substitute ARK’s 7777 port or a Steam query port. Community-server discovery is a separate option. The current Palworld argument reference also says that, from version 1.0, leaving the older multithreading optimization flags unset may improve performance. Start without those copied flags and measure before changing them.
Valheim: Choose Steam or Crossplay Deliberately

Iron Gate documents installing Valheim Dedicated Server from Steam Library → Tools. Its guide does not establish an anonymous SteamCMD app-ID recipe, so this article does not substitute an unverified one. On a headless VPS, first establish a supported way to obtain that Linux package and its dependencies. Once it is installed under your game account, change to its actual installation directory and make a working copy of the supplied startup script. Updates can replace the original:
cd /PATH/TO/VALHEIM_DEDICATED_SERVER
cp start_server.sh start_my_server.sh
chmod 700 start_my_server.sh
Edit your copy with a unique server name, world name and password. Set -savedir /srv/games/worlds/valheim if you want an explicit save location, and create that directory first. Follow Iron Gate’s current library requirements, including the listed Linux packages, before launching ./start_my_server.sh. Use Ctrl+C for a clean foreground stop.
Without -crossplay, the server uses the Steam backend and its selected port plus the next port. With crossplay enabled, use the publisher’s relay connection procedure, public IP or join code; a loopback or local-IP test is not a valid crossplay connection test. Confirm that the selected backend matches your friends’ clients.
ARK: Survival Evolved: Match the Server Branch

This section concerns Survival Evolved, not Survival Ascended. The publisher’s Linux server instructions identify app 376030 and the Evolved executable. These are historical installation instructions; check the current release-branch notes below as well. Install it in its own directory:
steamcmd +force_install_dir /srv/games/servers/ark +login anonymous +app_update 376030 validate +quit
cd /srv/games/servers/ark/ShooterGame/Binaries/Linux
./ShooterGameServer 'TheIsland?listen?SessionName=PrivateVPS' -server -log
Keep inbound game traffic closed during initial setup. Before making it public, stop the server and set the server password, administrator password, map and other settings using the publisher’s configuration guidance. The command demonstrates the executable and map; it is not a complete secured production configuration or a verified port-binding recipe. Keep configuration files private to the service account, and avoid putting real administrator secrets into shared shell history.
ARK’s Aquatica transition changed the release branches. The publisher restored Linux binaries in August 2025 and retained preaquatica as an option for legacy clients, worlds and mods. Check current release notes and choose the same compatible branch on server and clients; do not automatically force everyone onto the rollback branch. Before any branch switch, make a restorable copy of the world and configuration.
Supervise the Process and Verify a Real Join
A foreground process stops when its session ends unless you arrange supervision. Once the chosen game starts correctly, configure a service manager for that exact launch command. Set the service user, working directory, startup command and graceful stop behavior explicitly. Test a normal stop before enabling automatic restarts; a process that is repeatedly killed while saving is not reliable.
For example, a systemd service for the preceding Palworld paths can begin with the following configuration. Save it as /etc/systemd/system/palworld.service using your administrator account, then validate it. Adjust the stop timeout only after observing how long your world needs to save.
[Unit]
Description=Palworld dedicated server
Wants=network-online.target
After=network-online.target
[Service]
Type=simple
User=gamehost
WorkingDirectory=/srv/games/servers/palworld
ExecStart=/srv/games/servers/palworld/PalServer.sh -port=8211
Restart=on-failure
RestartSec=10
KillSignal=SIGINT
TimeoutStopSec=300
UMask=0077
[Install]
WantedBy=multi-user.target
The restart delay and timeout are example operating settings, not publisher performance promises. This unit has been reviewed as a template, not runtime tested against a game world. Stop the foreground instance before starting the service, so two processes cannot compete for the same port or world.
sudo systemd-analyze verify /etc/systemd/system/palworld.service
sudo systemctl daemon-reload
sudo systemctl enable --now palworld
sudo systemctl status palworld --no-pager
sudo journalctl -u palworld -n 80 --no-pager
sudo ss -lunp
Inspect the logs for initialization errors, missing files and permission failures. A listening UDP socket proves only that a local process bound a port. Ping checks a different protocol and cannot prove that players can join. Complete these acceptance checks using a real game client from another network:
- Join with the intended address, port, backend and password.
- Confirm the correct map or world and compatible mods.
- Make a small world change, wait for a save, then disconnect.
- Stop and start the server cleanly, reconnect and verify that change persists.
- Test the provider and host firewall rules without opening administration ports to everyone.
For routine Palworld maintenance, authenticate with the configured administrator credentials and use the publisher’s in-game administrative commands: /Save, then /Shutdown 60 Maintenance. Verify that the process exits and inspect the logs before copying data or starting it again. The unit’s SIGINT setting is only a service-manager stop mechanism; a stop timeout can end in a forced kill and must not count as a successful clean save. Test the complete save, shutdown and restart sequence with your world.
For Valheim and ARK, build separate service units around their own scripts and save/stop behavior. Do not substitute an executable name into the Palworld example and assume the resulting lifecycle is equivalent.
Back Up Worlds Before Updates

World recovery needs more than a directory named “backups.” Identify the actual save files, settings, mod list and server/client branch. Keep a copy outside the VPS and test restoring it. A snapshot of the same host is useful for rollback, but it does not replace an independent copy when that host or account becomes unavailable.
Choose the backup frequency from the amount of progress your group is willing to lose. Before an update, announce downtime, save using the game’s supported mechanism, stop cleanly, and confirm the process has exited. Copy the complete required data while it is no longer being written. Archive retention should preserve known-good recovery points; do not automatically delete everything older than a fixed age without checking restore coverage.
| Game | What the recovery record should include | Restore check |
|---|---|---|
| Palworld | The actual Pal/Saved tree, live configuration and matching server version | Load the intended world and verify player progress on an isolated test instance |
| Valheim | The configured save directory, world files, permission lists and your startup-script copy | Confirm world name, latest changes, password and permission lists |
| ARK: Survival Evolved | The actual saved-world/configuration directories, map, mods and selected branch | Load the correct map with the compatible build/mod set and inspect the save |
Check an archive’s contents and verify a test restore, not merely the archive command’s exit code. Keep the test server private so clients cannot accidentally join the recovery copy. The self-hosted backup guide explains broader backup-tool choices.
Perform updates during a maintenance window. Review release notes, stop the service and make the pre-update recovery copy before updating through the game’s supported installation route. For SteamCMD-managed games, the validate option can replace modified files managed by Steam; keep local configuration and startup customizations backed up separately. Restart, inspect logs and repeat the real-join/save test before reopening the server.
Measure Before Adding Players
Measure while your actual world is active, including autosaves and busy sessions. A mostly idle new world tells you little about a modded server after weeks of building. Use basic host checks as a starting point:
free -h
df -h
vmstat 1 10
top
Look for sustained memory pressure, swap activity, a saturated game thread, disk-space shortages and errors around save operations. In a virtual machine, CPU contention can matter even when the nominal vCPU count looks sufficient. Network throughput, latency variation and packet loss deserve separate checks. There is no universal “85% CPU” or “1 GB free” threshold that proves a game server is healthy.
Change one factor at a time: reduce a costly mod, adjust a supported game setting, choose a better region or increase the resource that is actually constrained. Retest the same workload afterward. Our VPS optimization guide provides broader diagnostic context.
A useful launch milestone is simple: friends can join, the intended world persists, access is restricted, and you can restore a recent backup. Expand the player group only after those checks pass and you have measured enough headroom.
Frequently Asked Questions
What VPS specifications do Palworld, Valheim and ARK need?
Does Palworld require a custom ISO?
Which UDP port does Palworld use?
Can all three game servers share one small VPS?
Are automatic snapshots enough to protect game worlds?