
Before installing anything, verify that your server meets the minimum requirements to run Odoo efficiently. For a small production setup, use Ubuntu 22.04, 2 vCores, 4 GB RAM, and 20 GB SSD at a minimum. Odoo is Python-based and uses PostgreSQL for the database; both will compete for memory under load. With less than 4 GB RAM, imports, module installs, and background jobs can slow down significantly.
Use this checklist before you continue:
- OS: Ubuntu Server 22.04 LTS
- CPU: 2 vCores minimum
- Memory: 4 GB RAM minimum
- Storage: 20 GB SSD minimum
- Access: SSH access with a private key (not password-only login)
- Privileges: A user with sudo rights or direct root access
- Packages available: Python 3.8+, Git, and wget
Each item is critical—Python 3.8+ is required since modern Odoo releases and many community modules expect a current runtime. Git cleanly pulls the Odoo source and simplifies updates, while wget easily retrieves installer files and keys.
Run these commands to check your system configuration:
lsb_release -a
python3 --version
git --version
wget --version | head -n1
free -h
df -h /
whoami
sudo -l
You should see Ubuntu 22.04, Python 3.8 or newer, at least 20 GB disk space, and confirmation that your user can run `sudo`. Once confirmed, move to provisioning your server and securing SSH.
Provision a VPS Instance and Secure SSH Access
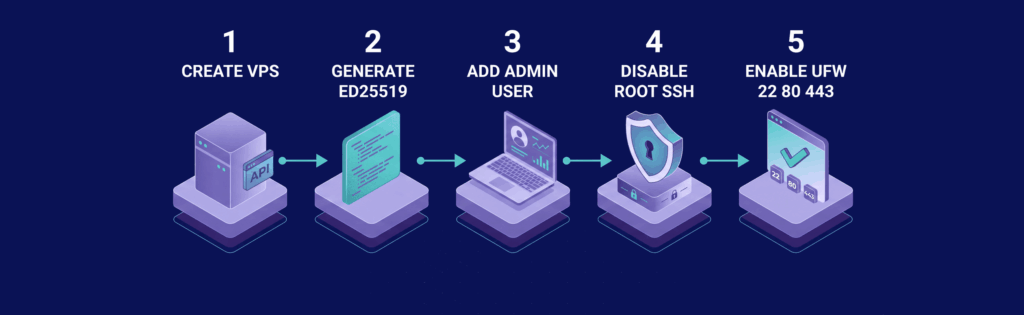
The aim is to get a clean Ubuntu 22.04 server online, enable SSH key-only access, and open only the necessary ports for Odoo. Automating this process via an API ensures reproducible builds with consistent OS, region, and SSH key policy.
First, create the instance with your SSH public key attached (replace placeholders as needed):
curl -X POST https://api.vps.us/v1/instances \
  -H "Authorization: Bearer YOUR_API_TOKEN" \
  -H "Content-Type: application/json" \
  -d '{
    "name": "odoo-prod-01",
    "region": "new-york",
    "image": "ubuntu-22.04",
    "vcpu": 2,
    "memory_mb": 4096,
    "storage_gb": 40,
    "ssh_keys": ["my-laptop-ed25519"]
  }'
Verify the instance by listing it and checking for a public IPv4 address and a `running` status:
curl -H "Authorization: Bearer YOUR_API_TOKEN" \
  https://api.vps.us/v1/instances
For additional container management insights, consider exploring Docker VPS Hosting for efficient container setups on your server.
If you haven’t created an SSH key yet, generate one locally. Ed25519 is a modern, fast, and secure choice:
ssh-keygen -t ed25519 -C "odoo-admin" -f ~/.ssh/odoo_ed25519
cat ~/.ssh/odoo_ed25519.pub
Confirm the key was generated:
ls -l ~/.ssh/odoo_ed25519*
Once the VPS is active, connect as root, create an admin user, and secure SSH by disabling root login. This prevents exposing the root account directly to the internet:
ssh -i ~/.ssh/odoo_ed25519 root@SERVER_IP
adduser odooadmin
usermod -aG sudo odooadmin
mkdir -p /home/odooadmin/.ssh
cp ~/.ssh/authorized_keys /home/odooadmin/.ssh/authorized_keys
chown -R odooadmin:odooadmin /home/odooadmin/.ssh
chmod 700 /home/odooadmin/.ssh
chmod 600 /home/odooadmin/.ssh/authorized_keys
sed -i 's/^#\?PermitRootLogin.*/PermitRootLogin no/' /etc/ssh/sshd_config
sed -i 's/^#\?PasswordAuthentication.*/PasswordAuthentication no/' /etc/ssh/sshd_config
systemctl reload ssh
ufw allow 22/tcp
ufw allow 80/tcp
ufw allow 443/tcp
ufw enable
ufw status
Verify by opening a new terminal and logging in as the new user:
ssh -i ~/.ssh/odoo_ed25519 odooadmin@SERVER_IP
sudo ufw status
The expected output shows `active` with only ports 22, 80, and 443 allowed.
Install System Packages and Dependencies
With SSH secured, install the OS-level packages required by Odoo. This setup enables Odoo to generate PDF reports, compile web assets, and build necessary Python modules.
Refresh the package index and update the system:
sudo apt update && sudo apt -y upgrade
sudo apt install -y \
  python3 python3-pip python3-venv python3-dev \
  build-essential git curl wget \
  nodejs npm less \
  wkhtmltopdf
Packages Explanation:
- python3 & python3-pip: Run Odoo and install its libraries.
- python3-venv: Isolate Odoo’s Python environment.
- python3-dev & build-essential: Compile native extensions with `pip`.
- git: Clone and update the Odoo source code.
- curl & wget: Retrieve files and test network endpoints.
- nodejs, npm, & less: Build frontend assets.
- wkhtmltopdf: Generate PDFs for invoices and reports.
Verify installations:
python3 --version
pip3 --version
git --version
node --version
npm --version
wkhtmltopdf --version
Set Up PostgreSQL Database for Odoo
Odoo stores its data in PostgreSQL. A clean installation with dedicated roles improves security by restricting permissions.
Install PostgreSQL and its client tools:
sudo apt update
sudo apt install -y postgresql postgresql-client
sudo systemctl enable --now postgresql
sudo systemctl status postgresql --no-pager
Verify PostgreSQL version and active status:
psql --version
sudo systemctl is-active postgresql
Create a dedicated PostgreSQL role and database for Odoo:
sudo -u postgres psql
Inside the PostgreSQL shell, run:
CREATE ROLE odoo WITH LOGIN PASSWORD 'ChangeThisToAStrongRandomPassword';
CREATE DATABASE odoo OWNER odoo;
ALTER ROLE odoo CREATEDB;
\q
Verify the role and database:
sudo -u postgres psql -c "\du"
sudo -u postgres psql -c "\l odoo"
For secure authentication, update the `pg_hba.conf` file:
sudo nano /etc/postgresql/14/main/pg_hba.conf
Add the following entries near the top:
#Allow the local Odoo app to authenticate with a password
local   all             odoo                                    md5
host    all             odoo            127.0.0.1/32            md5
host    all             odoo            ::1/128                 md5

#Keep admin access local
local all postgres peer
Reload PostgreSQL:
sudo systemctl reload postgresql
Test the connection using the `odoo` user:
PGPASSWORD='ChangeThisToAStrongRandomPassword' psql -h 127.0.0.1 -U odoo -d odoo -c "SELECT current_user, current_database();"
The output should display `odoo | odoo`.
Install Odoo Community Edition from Source

Installing Odoo from source allows better control over version stability and environment isolation.
Create a dedicated service account and clone the repository:
sudo adduser --system --home /opt/odoo --group odoo
sudo mkdir -p /opt/odoo
sudo chown -R odoo:odoo /opt/odoo
sudo -u odoo git clone --depth 1 --branch 18.0 https://github.com/odoo/odoo.git /opt/odoo/odoo
sudo -u odoo python3 -m venv /opt/odoo/venv
sudo -u odoo /opt/odoo/venv/bin/pip install --upgrade pip wheel setuptools
sudo -u odoo /opt/odoo/venv/bin/pip install -r /opt/odoo/odoo/requirements.txt
sudo mkdir -p /var/log/odoo
sudo chown odoo:odoo /var/log/odoo
Verify the active branch and installed packages:
sudo -u odoo git -C /opt/odoo/odoo branch --show-current
sudo -u odoo /opt/odoo/venv/bin/python3 -m pip list | head
Next, create a minimal configuration file for Odoo:
[options]
admin_passwd = ChangeThisAdminMasterPassword
 db_host = 127.0.0.1
 db_port = 5432
 db_user = odoo
 db_password = ChangeThisToAStrongRandomPassword
 db_name = odoo
 addons_path = /opt/odoo/odoo/addons
 logfile = /var/log/odoo/odoo.log
 proxy_mode = True
 xmlrpc_port = 8069
Save this as `/etc/odoo.conf` and secure its permissions:
sudo tee /etc/odoo.conf > /dev/null <<'EOF'
[options]
admin_passwd = ChangeThisAdminMasterPassword
 db_host = 127.0.0.1
 db_port = 5432
 db_user = odoo
 db_password = ChangeThisToAStrongRandomPassword
 db_name = odoo
 addons_path = /opt/odoo/odoo/addons
 logfile = /var/log/odoo/odoo.log
 proxy_mode = True
 xmlrpc_port = 8069
EOF
Then
udo chown odoo:odoo /etc/odoo.conf
sudo chmod 640 /etc/odoo.con
Confirm the configuration:
sudo ls -l /etc/odoo.conf
sudo -u odoo grep -E 'db_|logfile|addons_path' /etc/odoo.conf
Configure Nginx Reverse Proxy and SSL

Odoo by default listens on port 8069, but user access should occur over standard ports with TLS terminated at Nginx. This setup provides HTTPS connections, improved logging, and easier certificate renewals.
Install Nginx and Certbot:
sudo apt update
sudo apt install -y nginx certbot python3-certbot-nginx
sudo rm -f /etc/nginx/sites-enabled/default
sudo nano /etc/nginx/sites-available/odoo
Insert the following Nginx configuration:
upstream odoo_backend {
    server 127.0.0.1:8069;
    keepalive 32;
}
server {
listen 80;
listen [::]:80;

server_name odoo.example.com;

location /.well-known/acme-challenge/ { root /var/www/html; }
location / {
return 301 https://$host$request_uri;
}
}

server {
listen 443 ssl http2;
listen [::]:443 ssl http2;

server_name odoo.example.com;

ssl_certificate /etc/letsencrypt/live/odoo.example.com/fullchain.pem;
ssl_certificate_key /etc/letsencrypt/live/odoo.example.com/privkey.pem;

proxy_read_timeout 720s;
proxy_connect_timeout 60s;
proxy_send_timeout 720s;

location / {
proxy_pass http://odoo_backend;
proxy_set_header Host $host;
proxy_set_header X-Real-IP $remote_addr;
proxy_set_header X-Forwarded-For $proxy_add_x_forwarded_for;
proxy_set_header X-Forwarded-Proto https;
proxy_redirect off;
}
}
Enable the configuration and test it:
sudo ln -s /etc/nginx/sites-available/odoo /etc/nginx/sites-enabled/odoo
sudo nginx -t
sudo systemctl reload nginx
Verify with:
sudo nginx -t && systemctl status nginx --no-pager
Redirect HTTP to HTTPS
The configuration forces all HTTP requests to HTTPS with a permanent redirect. Test the redirect:
curl -I http://odoo.example.com
curl -I https://odoo.example.com
The first command should show a `301 Moved Permanently` to HTTPS. Once confirmed, request the SSL certificate with Certbot:
sudo mkdir -p /var/www/html
sudo certbot certonly --webroot -w /var/www/html -d odoo.example.com
sudo systemctl reload nginx
Automate renewal by adding a deploy hook:
sudo mkdir -p /etc/letsencrypt/renewal-hooks/deploy
sudo tee /etc/letsencrypt/renewal-hooks/deploy/nginx-reload.sh > /dev/null <<'EOF'
#!/bin/sh
systemctl reload nginx
EOF
sudo chmod +x /etc/letsencrypt/renewal-hooks/deploy/nginx-reload.sh
sudo certbot renew --dry-run
Verify renewal with:
sudo certbot renew --dry-run
openssl s_client -connect odoo.example.com:443 -servername odoo.example.com </dev/null 2>/dev/null | openssl x509 -noout -dates
Create and Enable the Odoo systemd Service
Transform Odoo into a managed service that starts on boot, restarts after a crash, and logs into the system journal. Create the unit file:
[Unit]
Description=Odoo ERP
After=network.target postgresql.service
Wants=postgresql.service

[Service]

Type=simple
User=odoo
Group=odoo
WorkingDirectory=/opt/odoo/odoo
ExecStart=/opt/odoo/venv/bin/python3 /opt/odoo/odoo/odoo-bin -c /etc/odoo.conf
Restart=on-failure
RestartSec=5
StandardOutput=journal
StandardError=journal

[Install]

WantedBy=multi-user.target
Save this as `/etc/systemd/system/odoo.service` and load it:
sudo tee /etc/systemd/system/odoo.service > /dev/null <<'EOF'
[Unit]
Description=Odoo ERP
After=network.target postgresql.service
Wants=postgresql.service

[Service]
Type=simple
User=odoo
Group=odoo
WorkingDirectory=/opt/odoo/odoo
ExecStart=/opt/odoo/venv/bin/python3 /opt/odoo/odoo/odoo-bin -c /etc/odoo.conf
Restart=on-failure
RestartSec=5
StandardOutput=journal
StandardError=journal

[Install]
WantedBy=multi-user.target

EOF
Then reload daemon and service:
sudo systemctl daemon-reload
sudo systemctl enable --now odoo
sudo systemctl status odoo --no-pager
Confirm the service status:
sudo systemctl is-enabled odoo
sudo systemctl is-active odoo
sudo journalctl -u odoo -n 20 --no-pager
Tune Performance for Production Workloads

If Odoo experiences sluggishness under heavy use, adjust the number of workers and tune memory allocations. A practical worker baseline is (vCores × 2) – 1. Each worker uses roughly 150–250 MB of RAM, so balance is essential.
| VPS Size | Baseline Workers | Safer Workers if RAM Tight | PostgreSQL shared_buffers | PostgreSQL work_mem |
|---|---|---|---|---|
| 2 vCores / 4 GB | 3 | 2 | 512MB | 8MB |
| 4 vCores / 8 GB | 7 | 5 | 1GB | 16MB |
| 6 vCores / 12 GB | 11 | 8 | 2GB | 16MB |
| 8 vCores / 16 GB | 15 | 10–12 | 4GB | 32MB |
For additional insights, check out Self Hosted Analytics Tools for monitoring and optimization recommendations.
Update your Odoo configuration to include worker settings:
[options]
workers = 3
max_cron_threads = 1
proxy_mode = True
limit_memory_soft = 2147483648
limit_memory_hard = 2684354560
limit_time_cpu = 60
limit_time_real = 120
Restart Odoo and check the worker processes:
sudo systemctl restart odoo
ps -ef | grep odoo | grep -v grep
Tune PostgreSQL by editing its configuration (e.g., in `postgresql.conf`):
shared_buffers = 512MB
work_mem = 8MB
effective_cache_size = 2GB
Reload PostgreSQL:
sudo systemctl reload postgresql
sudo -u postgres psql -c "SHOW shared_buffers;"
sudo -u postgres psql -c "SHOW work_mem;"
Set Up Automated Backups and Recovery

A fast Odoo server must be paired with a solid backup strategy. Back up both your PostgreSQL database and the filestore (typically under `~/.local/share/Odoo`). The following script compresses the database dump and synchronizes the filestore to remote storage:
sudo tee /usr/local/bin/odoo-backup.sh > /dev/null <<'EOF'
#!/bin/bash
set -euo pipefail
BACKUP_ROOT="/var/backups/odoo"
DATE="$(date +%F-%H%M)"
DB_NAME="odoo"
DB_USER="odoo"
FILESTORE="/opt/odoo/.local/share/Odoo"
REMOTE="backupuser@BACKUP_SERVER:/srv/odoo-backups"
export PGPASSWORD='ChangeThisToAStrongRandomPassword'
mkdir -p "$BACKUP_ROOT/$DATE"
pg_dump -h 127.0.0.1 -U "$DB_USER" -F c "$DB_NAME" > "$BACKUP_ROOT/$DATE/${DB_NAME}.dump"
rsync -a "$FILESTORE/" "$BACKUP_ROOT/$DATE/filestore/"
rsync -az --delete "$BACKUP_ROOT/" "$REMOTE/"
find "$BACKUP_ROOT" -mindepth 1 -maxdepth 1 -type d -mtime +7 -exec rm -rf {} \;
EOF
Then gives permissions to the script:
sudo chmod 700 /usr/local/bin/odoo-backup.sh
sudo /usr/local/bin/odoo-backup.sh
For additional backup strategies, review Self Hosted Backup Software.
Verify backups:
sudo find /var/backups/odoo -maxdepth 2 -type f
sudo du -sh /var/backups/odoo
Automate daily backups at 02:15 by adding this cron job:
15 2 * root /usr/local/bin/odoo-backup.sh >> /var/log/odoo-backup.log 2>&1
Check the cron entry and log:
sudo crontab -l
sudo tail -n 20 /var/log/odoo-backup.log
sudo find /var/backups/odoo -maxdepth 1 -type d | sort
For recovery, restore first to a new database:
sudo systemctl stop odoo
sudo -u postgres dropdb --if-exists odoo_restore
sudo -u postgres createdb -O odoo odoo_restore
sudo -u postgres pg_restore -d odoo_restore /var/backups/odoo/DATE/odoo.dump
sudo rsync -a /var/backups/odoo/DATE/filestore/ /opt/odoo/.local/share/Odoo/filestore/odoo_restore/
sudo systemctl start odoo
Verify the restore with:
sudo -u postgres psql -d odoo_restore -c "\dt"
Verify Installation and Log into Odoo
Open `https://odoo.example.com` in your browser—ensure that you are not using `http` or the `:8069` port directly. Confirm that Nginx is proxying correctly, your SSL certificate is valid, and Odoo is accessible only through HTTPS. If issues arise, test connectivity from the server:
curl -I https://odoo.example.com
sudo ss -tulpn | grep -E ':80|:443|:8069'
sudo ufw status
Upon first access, Odoo displays a database creation screen. Complete the fields and use the master password from `/etc/odoo.conf` when prompted. After logging in, create a sample record in Contacts to verify that both PostgreSQL and the filestore are functioning correctly.
If errors occur, review the logs:
sudo journalctl -u odoo -n 50 --no-pager
sudo tail -n 50 /var/log/odoo/odoo.log
Successful output confirms that Odoo’s installation is complete and production-ready.
Frequently Asked Questions
What are the minimum server requirements for running Odoo on a VPS?
Why is it necessary to disable root SSH login?
How can I safely update and maintain Odoo dependencies?
What is the advantage of using a reverse proxy like Nginx with Odoo?